If you need assistance with logging in, you can find your username or password on the login page.
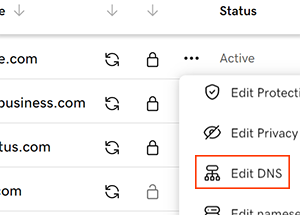
Locate the domain you want to edit and click on "Domain Edit Options" next to it. Then, choose "Edit DNS" from the dropdown menu. You might need to scroll down to see the "Edit DNS" option.
Name: This is the domain or subdomain for the MX record. You can use "@" to deliver email to your root domain, or specify a subdomain like "www" or "mail."
Priority: The priority determines the order in which the record is evaluated and used. Lower priorities will be read before higher priorities.
Value: Provide the mail server's address, such as "smtp.secureserver.net."
TTL: TTL stands for "Time to Live" and refers to how long the server should cache the information. The default setting is usually 1 hour.
NOTE:DNS updates typically take effect within an hour, but it may take up to 48 hours to propagate globally